Every visitor who leaves your site without subscribing is a potential long-term customer you just lost.
To capture the attention of these hesitant shoppers and convert them into buying ones, Shopify newsletter signup form is the right tool.
Capturing the email addresses is the first step toward building your customer base. Learn how to do it by learning how to create Shopify newsletter signup form in minutes.
In this blog, we explain,
- When and where to use Shopify newsletter signup form?
- How to create a newsletter signup form in Shopify?
- Using the built-in Shopify Forms app
- Using a third-party app
Create targeted newsletter popups with Retainful and grow your email list fast.
When and where to use Shopify newsletter signup forms?
Most of the popups like Shopify newsletter signup forms look banging but appear at the wrong time, ending up annoying the customer rather than piquing their interest.
Here are when and where to use Shopify newsletter signup forms.
At the start of a customer’s journey
When a visitor lands on your site, it’s your one chance to grab their attention.
They’re not ready to buy yet? But they might be ready to hear from you later. Show a well-timed Shopify welcome newsletter signup form popup when the customer lands in the store.
After they engage with your content
Say they’re scrolling your product pages. One sign to say that are hooked is the scroll percentage. You can show the Shopify newsletter signup form popup once they cross the 60% mark.
During a limited-time promotion
Running a Black Friday sale? Or offering early access to a new collection? Use a newsletter signup form to build hype.
Time it with urgency like, “Sign up before midnight for VIP access,” and FOMO.
When they’re about to leave (Exit-Intent Popup)
They’re moving their mouse to hit the X. Your Shopify exit-intent newsletter signup popup should catch their attention and make them reconsider abandoning you. It’s your last shot to turn a visitor into a lead.
How to create a newsletter signup form in Shopify?
You can create a newsletter signup form in Shopify in two ways:
- Using the built-in Shopify Forms app
- Using a third-party app
1. Adding a Shopify newsletter signup form using the built-in Shopify Forms app
The steps to create a Shopify newsletter signup form are:
Step 1: Install Shopify Forms
Step 2: Choose the type of newsletter popup
Step 3: Customize the newsletter popup template
Step 4: Set the Shopify newsletter popup trigger
Step 5: Integrate with email automation and workflows
Step 6: Go live
Step 1: Install Shopify Forms
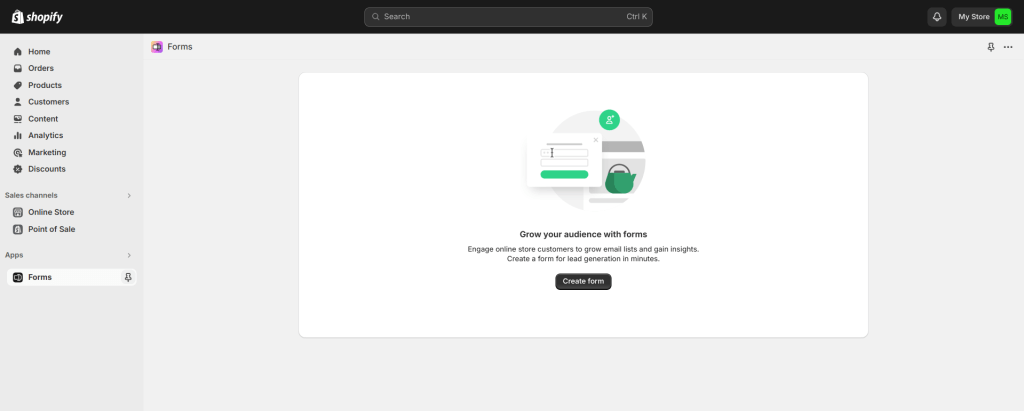
To create a newsletter signup form in Shopify, go to Shopify Admin -> Apps -> ‘Forms’.
Install the ‘Forms’ app to your Shopify store.
Step 2: Choose the type of newsletter popup
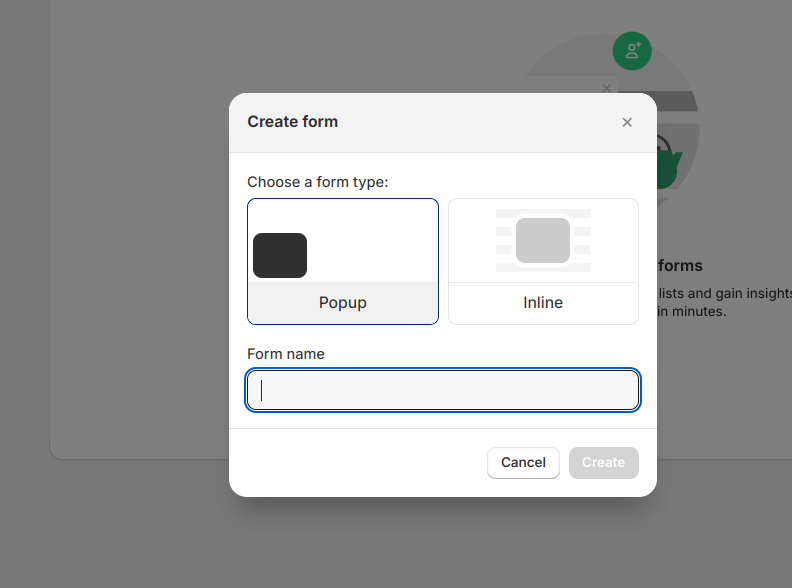
Select whether to create a Shopify newsletter signup form popup or an inline form, and enter a name for the form.
Step 3: Customize the Shopify newsletter popup template
Customizing a Shopify newsletter popup template involves choosing how you want to display it, writing the teaser content, styling the popup’s look, and CTAs.
- Choosing the display type: Floating popups are less intrusive. They appear in a smaller size and are often displayed at the corner or bottom of the page.
Overlay popups cover the entire webpage or a significant portion of it with a noticeable background dimming. - Editing the teaser content: A teaser in Shopify popup is a small preview that appears on a website before the full popup is displayed. In Shopify, you can edit the content, position, and title of it.
- Write the content of the Shopify newsletter signup popup: Like the title, body of the popup, and the fields.
You can also add new fields to the signup form.
Add the CTA and optional disclaimer message to the newsletter signup form.
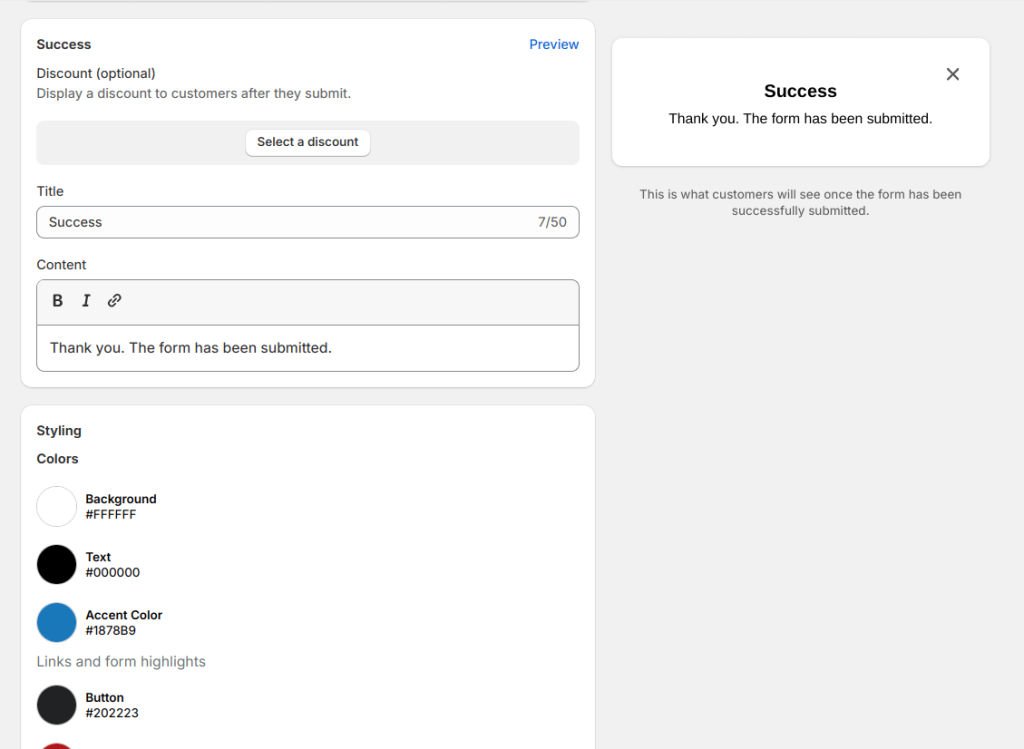
In this section, you can edit the message that will be shown after someone successfully submits the Shopify newsletter signup form.
Step 4: Set the Shopify newsletter popup trigger
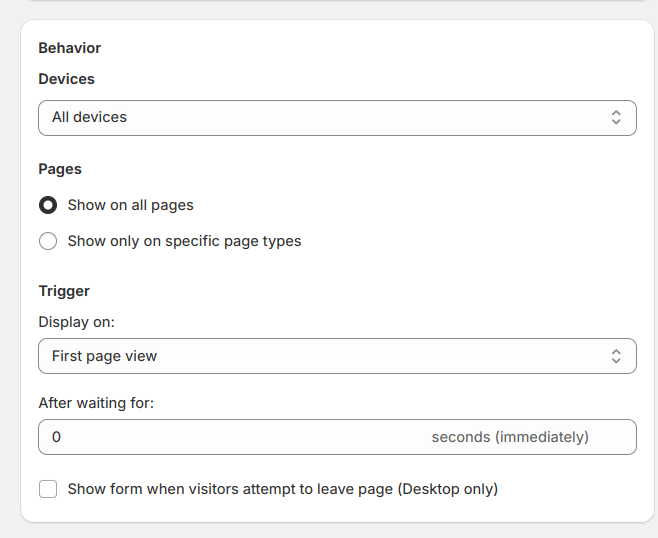
In this section, you can set up when and where your form should be displayed.
As a trigger, you can set it to display a Shopify newsletter signup form when a visitor views a certain number of pages on your Shopify store, and after a certain time delay.
Another option is available to trigger the Shopify newsletter popup when the visitor is about to leave the page.
Step 5: Integrate with email automation and workflows
The settings allow you to integrate your Shopify newsletter popup with an existing marketing automation in Shopify. You can connect to an existing automation, like a welcome email, or create a new one.
Step 6: Go live
Click save, and your Shopify newsletter signup form will go live.
You can see that Shopify Forms can serve basic needs when it comes to creating popups. Third-party apps provide a broader set of features tailored for more nuanced marketing strategies.
Display newsletter popups at the right time to the right people with Retainful’s advanced triggers and targeting.
2. Adding newsletter popups on Shopify using Retainful
Retainful offers targeted popups/signup forms to grow your email list by successfully capturing the email addresses of visitors.
Unlike the built-in Shopify Forms app, Retainful’s popups aren’t limited to just one type. Also, you can also choose a newsletter popup template from a variety of pre-designed ones and customize them to your liking.
You can trigger popups automatically based on visitor behavior and can be targeted to a specific group of customers.
Here are the steps to create Shopify newsletter signup form popups in Retainful.
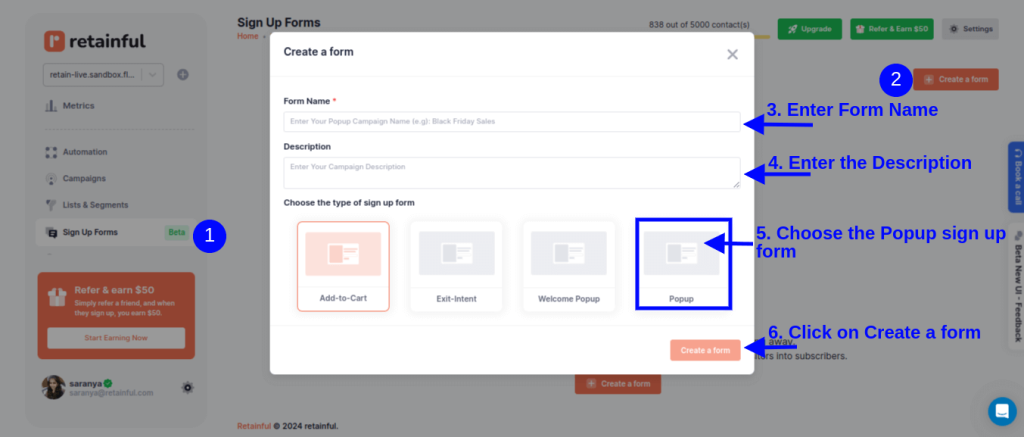
Step 1: Choose the type of popup
Login to your Retainful dashboard. Go to Signup Forms, choose ‘Popup’ and click on ‘Create a Form.’
Step 2: Choose the newsletter popup template
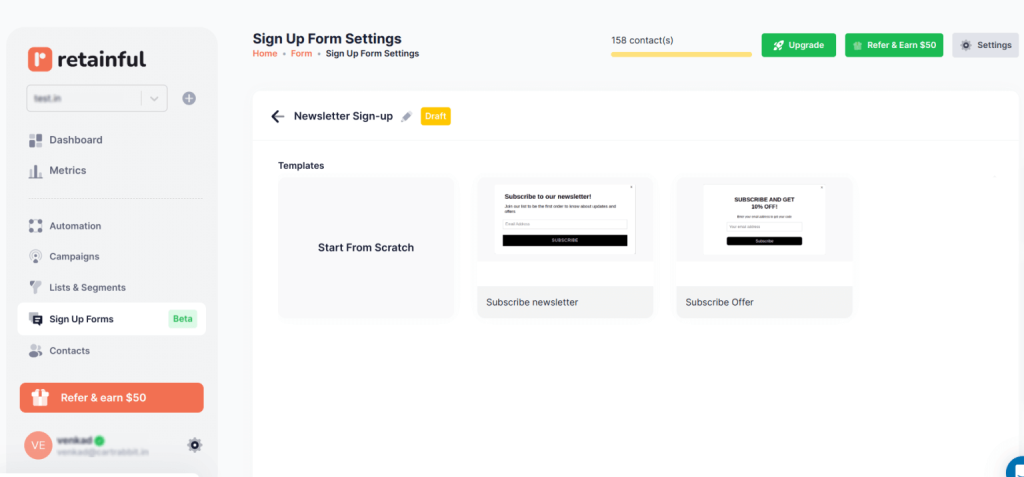
Retainful has many pre-designed popup templates to choose from or you can create your own from scratch.
Step 3: Customize the popup template
Retainful’s drag-and-drop editor offers a range of customizable blocks such as text, images, CTAs, and more.
You can add more elements to your Shopify newsletter popup like First name, last name, phone number, and legal consent.

Step 4: Set up the triggers and targeting
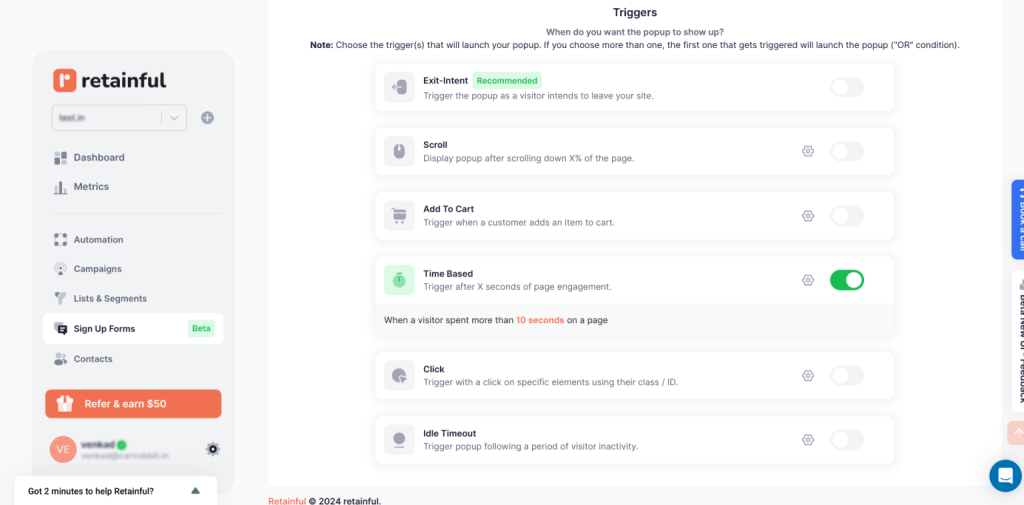
Choose the trigger to determine when you want to show the Shopify newsletter signup form popup.
Retainful has many triggers like:
- Exit-intent
- Scroll depth
- Add to cart
- Time-based
- Click-based
- Idle time
You can also select multiple triggers to make your Shopify newsletter signup popup more tuned to the visitor’s behavior.
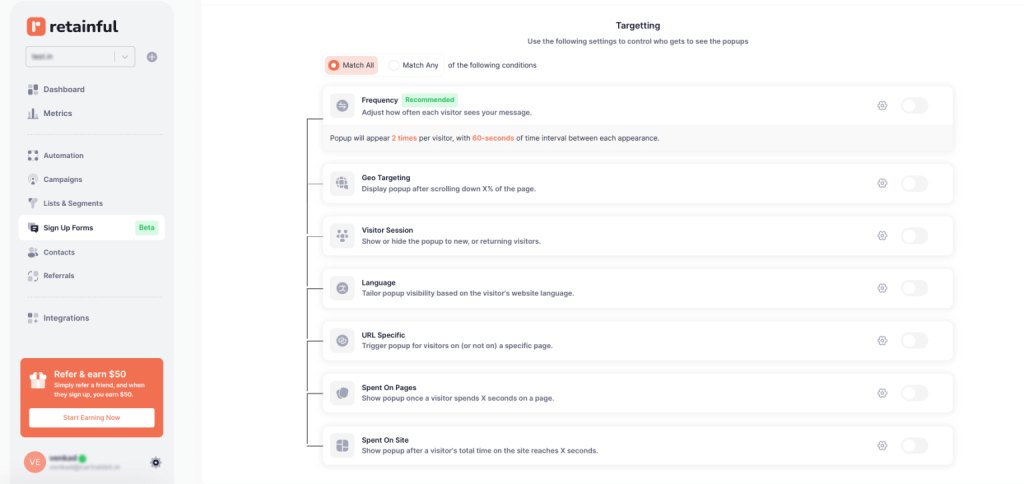
In the targeting, choose who should see your Shopify newsletter popup.
In Retainful, you can target popups based on:
- Location
- New or returning visitors
- Time spent on pages and site
- URL specific
Step 6: Enable the popup
There you have it.
After confirming your settings, enable the Shopify newsletter signup form popup. Your popup will be set live.
Create variety of popups and customize them with Retainful’s easy-to-use drag-and-drop editor.
Wrapping up!!
Not every visitor is ready to buy today, but with the right email, they could be tomorrow, or next week, or next month.
With a solid Shopify newsletter signup form isn’t just about collecting email addresses. It is the first step towards converting them into loyal customers. The real game starts after that.
Unlike Shopify’s default ‘Forms’ app, using a Shopify newsletter popup app like Retainful, you can create targeted and branded Shopify newsletter signup forms for your store within minutes.
Frequently Asked Questions
The steps to add newsletter popup in Shopify are:
Step 1: Install Retainful
Step 2: Choose the type of popup
Step 3: Customize popup template
Step 4: Set up the popup triggers and targeting
Step 5: Enable and go live.
You can create a newsletter signup form in Shopify in two ways:
1. Using the built-in Shopify Forms app
2. Using a third-party app like Retainful
The steps to add newsletter popup in Shopify using Retainful are:
Step 1: Install Retainful
Step 2: Choose the type of popup
Step 3: Customize popup template
Step 4: Set up the popup triggers and targeting
Step 5: Enable and go live.
You can embed a form in Shopify using ‘Shopify Forms’ app. Choose ‘Inline form’ to create a embedded form rather thann a popup.
The customization option in ‘Shopify Forms’ are limited.
To customize popup in Shopify:
Step 1: Install Retainful
Step 2: Choose the type of popup
Step 3: Customize popup template
Step 4: Set up the popup triggers and targeting
Step 5: Enable and go live.
