Too many popups annoy visitors and drive the customers away. But, when done right, a well-timed, Shopify welcome popup can convert casual browsers into buying ones.
The key is knowing when and how to use them without interrupting the shopping experience.
In this blog, learn when to show a Shopify welcome popup and how to add welcome popup in Shopify using Shopidy Forms app and a third-paty Shopify popup app.
Let’s dive in.
Create targeted Shopify welcome popups with Retainful and increase conversion rate by 2X.
When to show a Shopify welcome popup?
A Shopify welcome popup is a great way to engage new visitors and encourage conversions.
Here’s when you should show it:
First-time Visitors
Show a popup when a user first lands on your site. They’re likely unfamiliar with your store, and a welcome message helps to create a positive first impression and guide them to your value proposition.
After a Specific Time Spent on Site
Trigger the popup after a visitor has spent a certain amount of time (e.g., 10-20 seconds) on your store. This shows they’re interested, and a timely welcome popup can provide them with an incentive to stay or buy.
On Scroll:
Use a scroll-based trigger to display the popup when a user scrolls halfway down or further on a page. This shows they’re engaging with the content, making it a good moment to present them with a welcome offer or prompt.
What to show in a Shopify welcome popup?
But what should you show in that popup to actually get results?
Clear Value Proposition
Get straight to the point: What makes your store special? What’s in it for the customer? Show them why they should stick around.
Example: “We handpick the best deals so you don’t have to. Welcome to [Brand]!”
Compelling offer
Give visitors a reason to take action immediately. A discount is always a winner, but you can also offer free shipping, a free ebook, or an exclusive bonus.
Example: “Enjoy 10% off your first order. Use code: WELCOME10.”
Sign-Up prompt
Encourage them to join your email list with a simple sign-up form that collects email addresses of the visitors.
But don’t just say “sign up for our newsletter.” Make it sound like they’re getting something exclusive or valuable.
Urgency/scarcity
Give them a reason to act NOW. A time-sensitive discount popup or a limited stock alert creates a sense of urgency.
If they’re just browsing, you want them to feel like they’re about to miss out on something valuable.
Example: “Hurry! Only 10 items left in stock. Don’t miss out!”
Clear Call-to-Action
Make it dead easy for them to take the next step.
The Shopify welcome popup should clearly show what they need to do next, whether that’s claiming a discount, browsing a collection, or signing up for emails.
Example: “Grab Your Discount Now!” or “Browse Our Bestsellers.”
Related Reading: Learn how to create a Shopify newsletter popup step-by-step. How do you add a newsletter popup in Shopify?
How to add a welcome popup in Shopify?
You can add Shopify welcome popup in two ways:
- Using the built-in Shopify Forms app
- Using a third-party Shopify popup app
1. Adding a Shopify welcome popup using Shopify Forms app
The steps to add welcome popup in Shopify are:
Step 1: Install Shopify Forms app in your store
Step 2: Choose the position style of popup
Step 3: Customize the newsletter popup template
Step 4: Set the Shopify newsletter popup trigger
Step 5: Integrate with automations and workflows
Step 6: Go live
Let’s see these steps in detail.
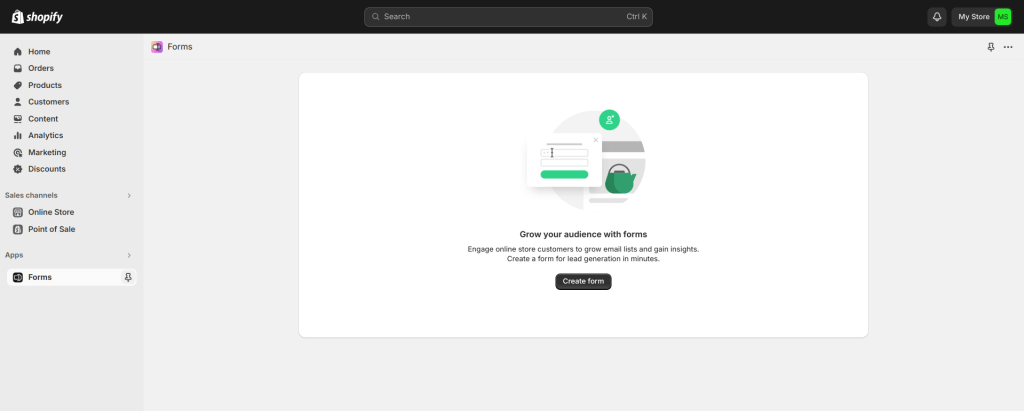
Step 1: Install Shopify Forms app in your store
Go to Shopify Admin -> Apps -> ‘Forms’.
Install the ‘Forms’ app to your Shopify store.
Step 2: Choose the position style of popup
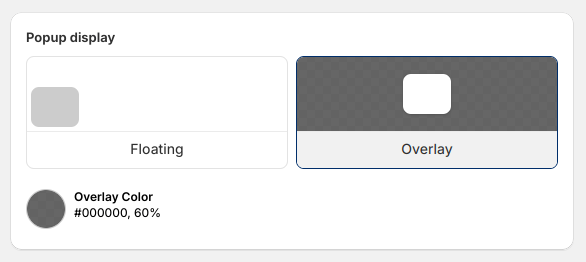
Choose how you want to position the Shopify welcome popup.
- Floating popups are less intrusive. They appear in a smaller size and are often displayed at the corner or bottom of the page.
- Overlay popups cover the entire webpage or a significant portion of it with a noticeable background dimming.
Step 3: Edit teaser and the popup content
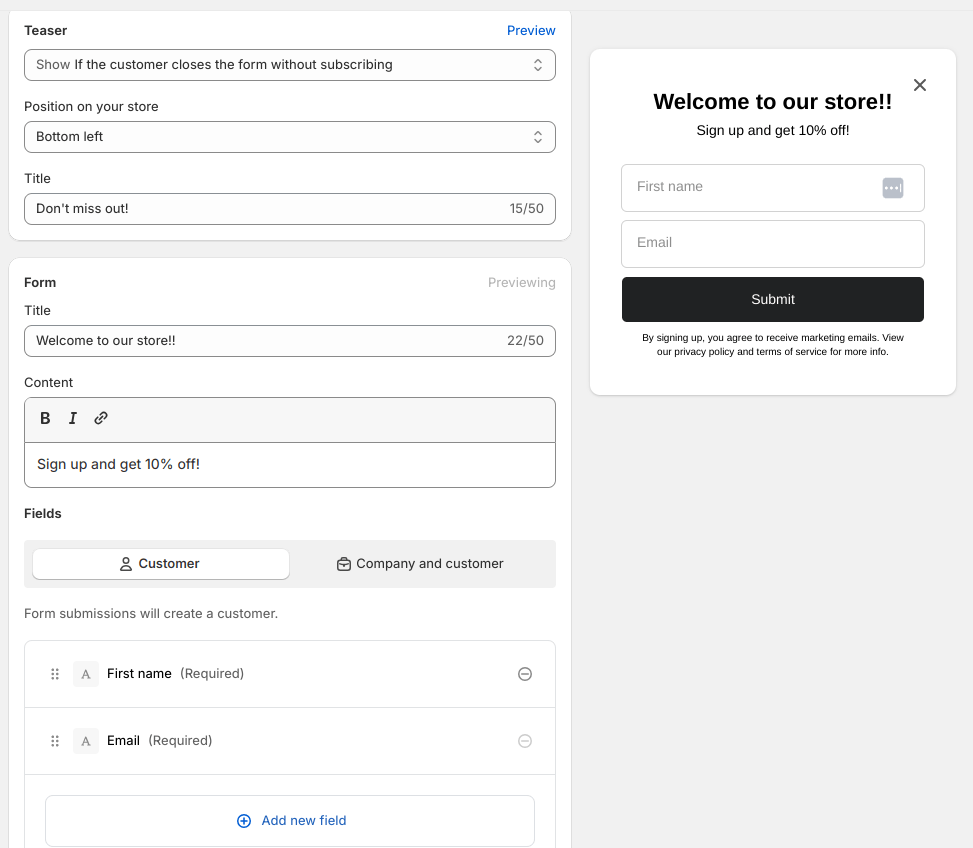
A teaser in Shopify popup is a small preview that appears on a website before the full popup is displayed.
In Shopify, you can edit the content, position and title of it.
Next, write the content of the Shopify welcome popup like
- Title
- Body of the popup
- Fields like first name and email address.
You can also add new fields like last name, phone number, birthday and more.
Add the CTA and optional disclaimer message at the bottom of the Shopify popup.
Step 4: Customize the Shopify welcome popup template
Next, customize how your Shopify welcome popup should look – like background color, typography, color of form fields and images.
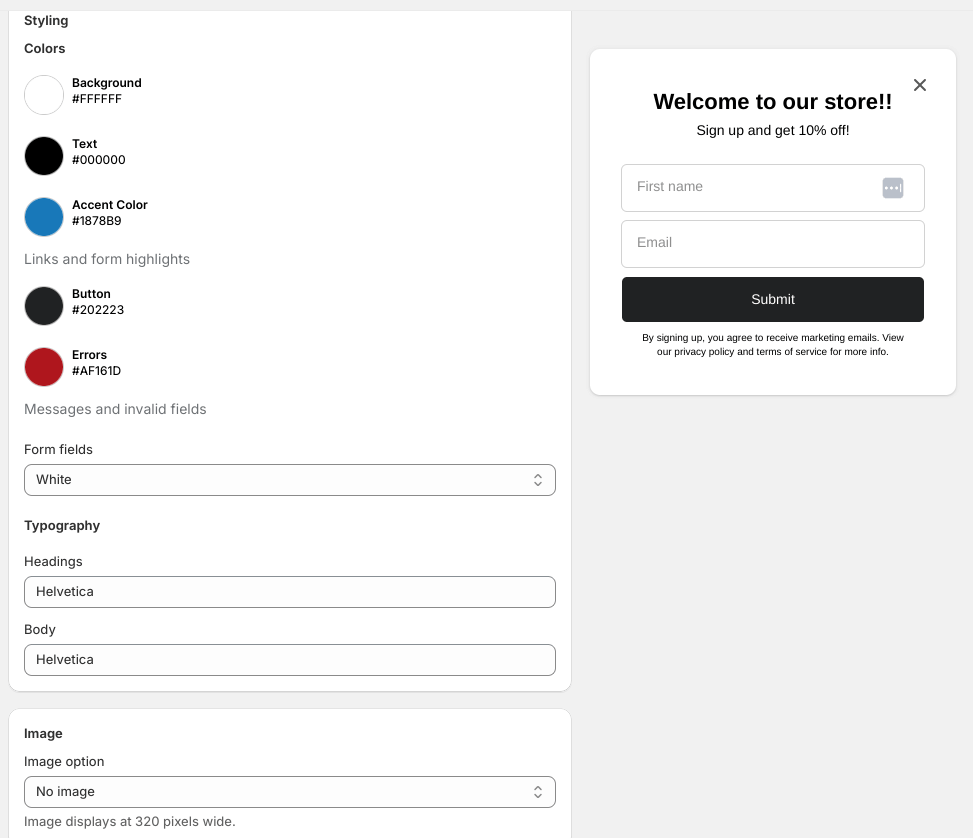
Step 5: Set the Shopify welcome popup trigger
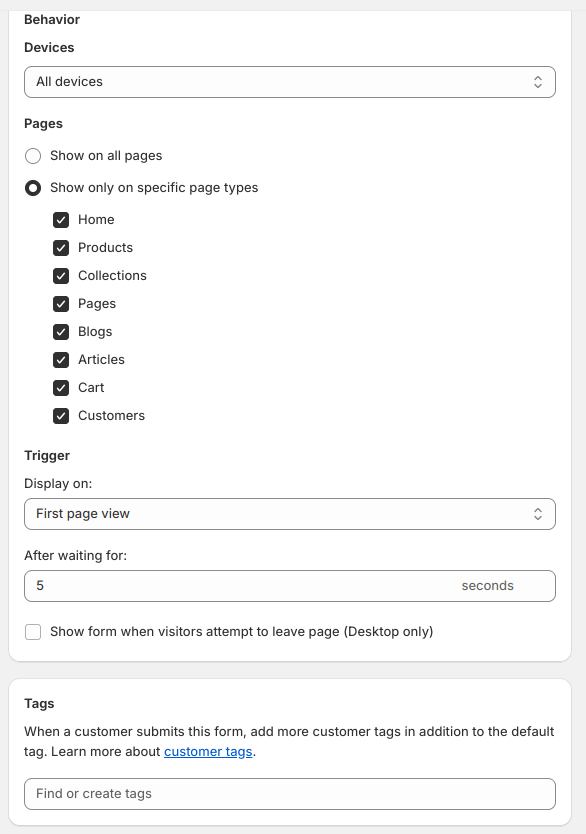
In the behavior section, you can set up when and where your form should be displayed.
As a trigger, you can set it to display a Shopify welcome popup when a visitor spends a certain time, like 10 seconds, or a specific page in your Shopify store.
Step 6: Integrate with automations and workflows
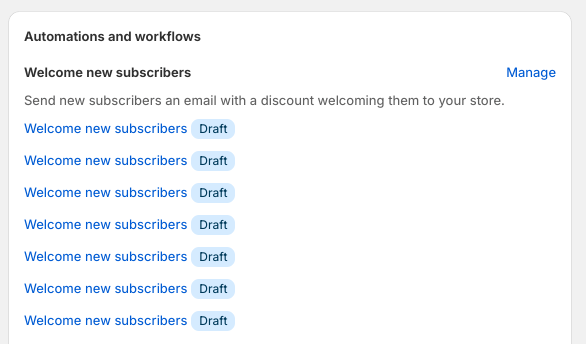
The settings allow you to integrate your Shopify welcome popup with an existing marketing automation in Shopify.
You can connect to an existing email automation, like a welcome email, or create a new one.
Step 7: Go live
Click save, and your Shopify welcome popup will go live.
2. Adding welcome popups on Shopify using Retainful
Retainful offers targeted popups/sign-up forms to grow your email list by successfully capturing the email addresses of visitors.
Unlike the built-in Shopify Forms app, Retainful’s popups aren’t limited to just one type. Also, you can also choose a newsletter popup template from a variety of pre-designed ones and customize them to your liking.
These popups are triggered automatically based on visitor behavior and can be targeted to a specific group of customers.
Here are the steps to create Shopify welcome popup in Retainful.
Step 1: Install Retainful in your Shopify store
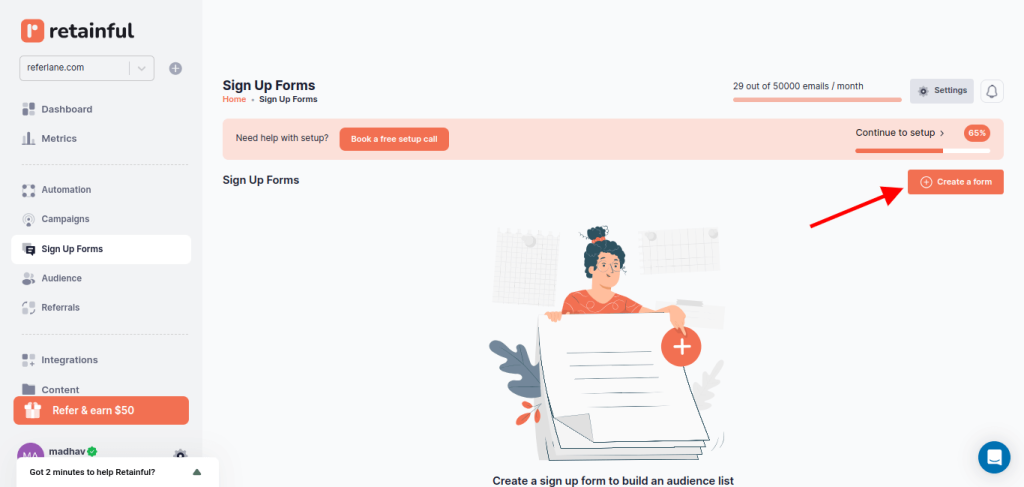
Install Retainfull from Shopify App Store and log in to Retainful Dashboard.
Go to Sign-up forms -> ‘Create Form’.
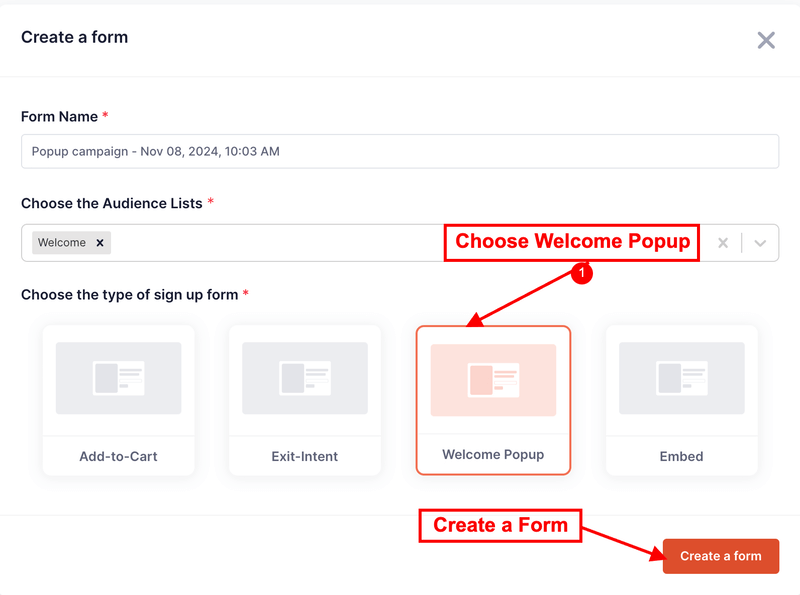
Step 2: Choose the type of popup
Choose the audience list you want to include the collected email address and choose the type of popup you want to create.
Step 3: Choose the popup template
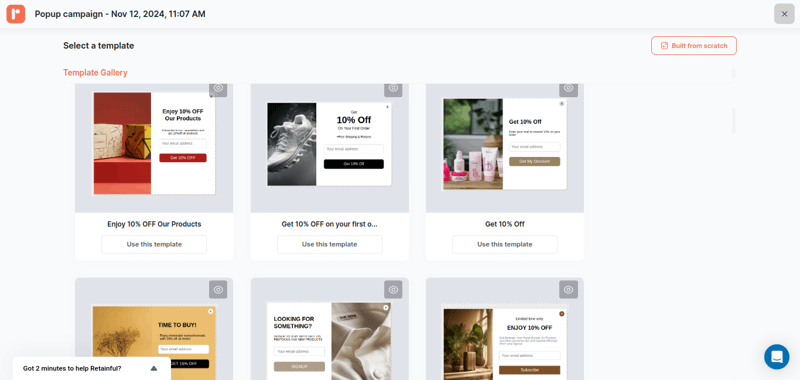
Retainful has a library of ready-made popup templates. You can choose one among them or create your own from scratch.
Step 4: Customize the popup template
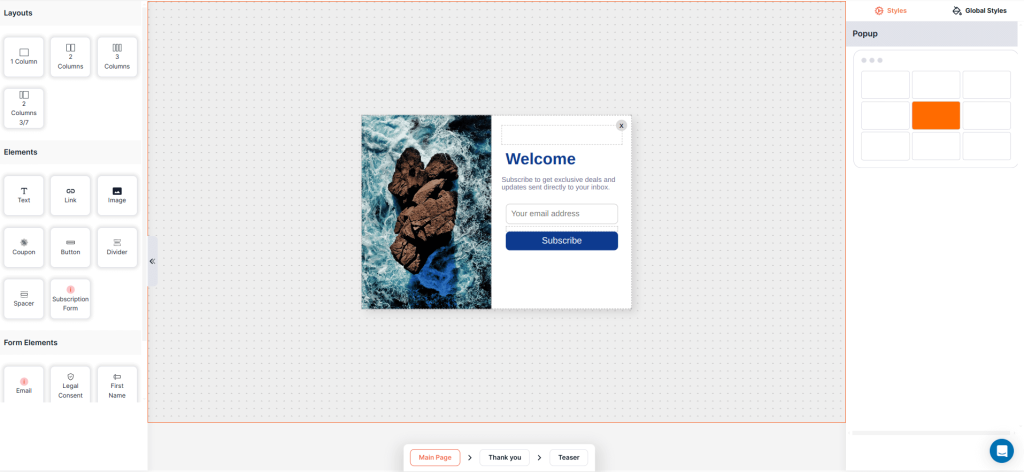
Retainful’s drag-and-drop editor offers a range of customizable blocks such as text, images, CTAs,coupon block, GDPR consent and more.
You can add more elements to your Shopify welcomewsletter popup like First name, last name, phone number and legal consent.
Step 5: Setup popup triggers and targeting
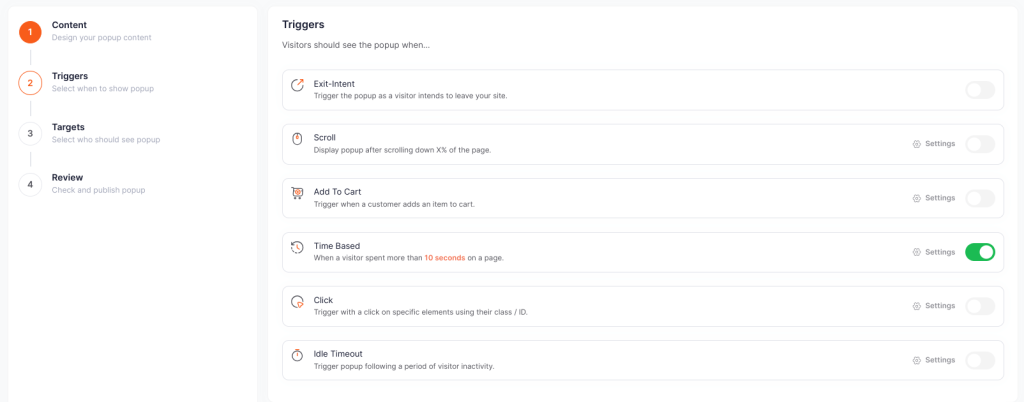
Choose the trigger to determine when you want to show the Shopify welcome popup.
You can trigger the welcome popup based on:
- Exit-intent
- Scroll depth
- Add to cart
- Time based
- Click-based
- Idle time
You can also select multiple triggers to make your Shopify welcome popup more tuned to the visitor’s behavior.
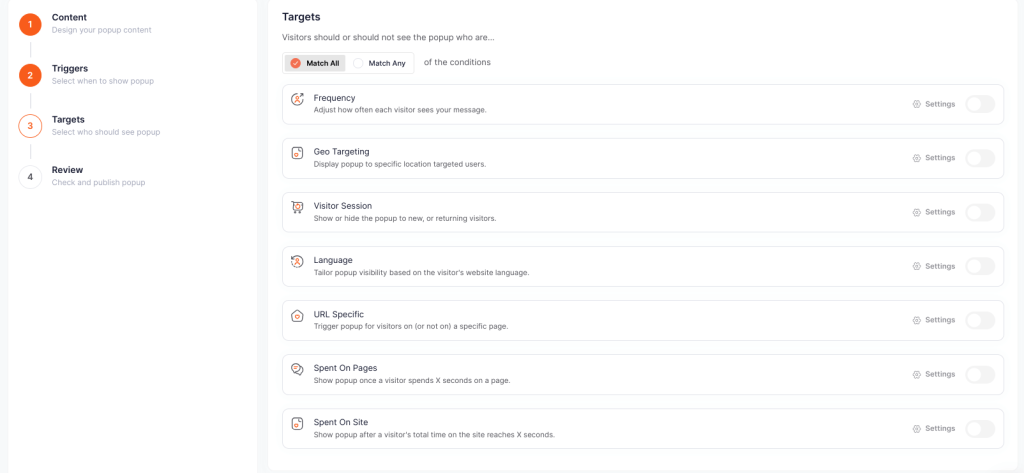
In the targeting, choose who should see your Shopify newsletter popup.
In Retainful, you can target popups based on
- Location
- New or returning visitors
- Time spent on pages and site
- URL specific
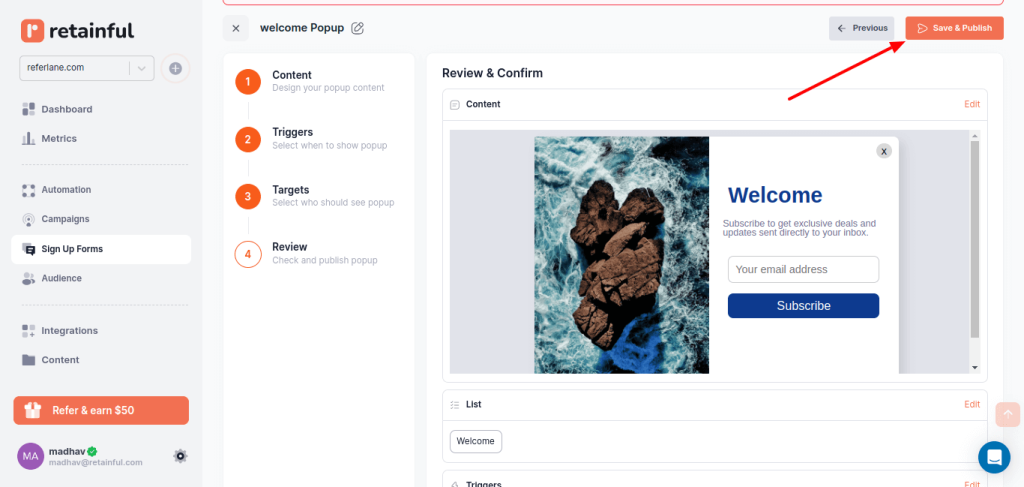
Step 6: Enable the popup and go live
After confirming your settings, enable the Shopify newsletter signup form popup. Your Shopify welcome popup will be set live.
Show Shopify welcome popup to targeted customers with Retainful’s advanced targeting and trigger options.
Wrapping up!!
Capturing visitors’ attention before they leave is a challenge. And if you’re not grabbing them with a clever popup, you’re missing out on valuable conversions.The right Shopify welcome popup can do all that.

